The measuring units have to be switched on some time before starting the machine so that they reach working temperature (approx 15-30 min)
BEARINGS
The pedestals have to be fixed to the bed at correct distance from each other as well as from the drive. If necessary lubricate the sliding surfaces with oil before displacing the pedestal. Height adjustment of the roller bearing has to be performed in accordance with the journal diameter of the rotor.
DRIVE
Place rotor on to the bearings.
Close counter support
Adjust roll or hold-down so that the journals just don’t touch the rotor.
ELECTRONIC UNIT
Set electronic unit in accordance with rotor dimensions, balancing speed and mode of compensation.
Apply black and white marking to the rotor.
Set photo scanning head.
Switch on driving motor.
OBSERVE SAFETY PRECAUTION
Before starting the drive make sure that the pedestals are correctly fix to the bed, the counter support are closed, the cover of the drive shaft-if available –is set up, the protection cover – if available – is placed over the rotor, nobody is in the danger field
MEASURING AND BALANCING
Start the drive
Run the rotor up to balancing speed
Take and retain the reading
Switch off drive and brake
Compensate
BALANCE ACCURACY, BALANCE QUALITY
(ISO Standards 1940 – BALANCE QUALITY GRADES)
1. Determine the Quality Grade of the Rotor
(ISO 1940 – Balance Quality Grade)
| Quality Grades G 16 G 6.3 G 2.5 G 1 (Precision Balancing) G 0.4 (High–Precision Balancing) | Individual Components of Engines (Gasoline or Diesel) for cars Normal Electrical armatures Medium and Large Electrical armatures with special requirements, small electrical armatures Phonograph drives, Grinding – machines drives Armatures of Precision grinders, gyroscopes |
2. Determine The Permissible Residual Unbalance Of The Rotor
Example : G = 6.3; Service speed 1500 rpm results in 40 gmm/kg of residual unbalance (rotor mass)
From this result that permissible residual unbalance of the rotor of e.g. 1.2 kg amounts to 48 gmm. This means the permissible residual static unbalance. With a symmetrical rotor this unbalance is distributed among two planes, i.e 24 gmm in each plane.
Note : The mass of unbalance to be compensated on the rotor to be balanced is determined in the same way as the rotor mass : by weighing it. In relation to our example this means : the rotor has a weight of 1.2 kg, the residual unbalance amounts to 24 gmm per plane, with a correction radius of e.g. 24 mm the residual mass of unbalance weights 1 g.
For reference see next table.
Table reference for maximum residual unbalance
BALANCING ON AUXILIARY ATTACHMENTS (SHAFT, FLANGES ETC) BY “RIGHTABOUT INDEXING”
Should auxiliary Attachments such as shaft, flanges or similar additional implements be necessarily added to the rotor in order to carry out the balancing procedure, the question would inevitably arise, to what extent the indicated total unbalance could actually be ascribed to the rotor itself and what part is due to the auxiliary attachment. Or in other terms, how to resolve the total unbalance in to two components, one of which would correspond to the unbalance of the rotor sought for.
Two measurements are necessary as a rule in order to determine two unknown values ( in the case considered both the unbalance components). For solving the problem, the successive measurements would have to be carried out under different condition.
This necessary variation generally applied in practical balancing is achieved by “right about indexing”. Which can be illustrated by the following supposed example :
a) Setup consisting of an exactly balanced auxiliary shaft with an eccentric fitted seat carrying an accurately balanced rotor.

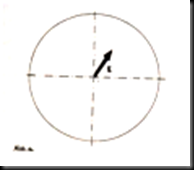
If the rotor is turned on the shaft, it becomes evident, that the unbalance condition expressed by the value E, does not depend upon the rotor angular position of the rotor with respect to the axis of the fitted seat is equal to zero as mentioned above.
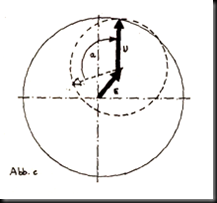
b) On the other hand should the rotor, considered in subdivision “a”, be affected itself with the unbalance “U”, this 
c) The rotor with the unbalance “U” is supposed to be turned by the angle about the center “E” invariable with respect to the phase generator or the contrasted marking for the photoelectric head.

d) This would open a way for practical determination of the center ”E” by carrying out successive runs with the rotor displaced angularly step by step (indexing) with respect to the fitted seat of the shaft, until the reading plotted on to the dial of the instrument (or on to a special diagram on graph paper) would sufficiently outline the shape of the circle described by the vector “U” :
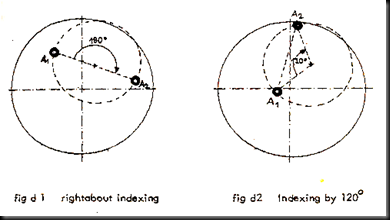
The radius of this circle corresponds to the unbalance of the rotor; the center of the circle is the reference spot, with respect to which this unbalance should be compensated for.
Two measurement with respective reading A1 and A2 (see fig d1 and d2) are as a rule sufficient to answer the question correctly. The arbitrarily chosen amount of angular displacement should be exactly known. An angle of 180o is often used for practical reasons.
AUXILIARY SHAFTS
Rotor without own shaft are either placed on an auxiliary shaft or connected to intermediate flanges unless balancing on a vertical machine is preferred.
In order to keep in actual operation the fine condition of balance achieved on the balancing machine, the accuracy of the auxiliary shaft has to be frequently ascertained. The closed fit with respect to the mating portion of the rotor of the cylindrical seat or the centering shoulder of the auxiliary shaft, as well as therate of eccentricity of the same shown by the amount of radial beat, have to be checked at regular intervals. Notwithstanding an accurate balancing on the machine, an excessive radial beat could cause the rotor to display in actual operation an unbalance, the magnitude of which depends upon the rate of eccentricity of the mating surfaces of the auxiliary shaft.
Should for instance the cylindrical seat of the auxiliary shaft be affected with a radial beat of 12 µ (0.00047 in) measured by means of a dial-gauge, a rotor balanced “up to zero” on such a shaft would still display with respect to its geometrical axis an unbalance by eccentricity of the center of gravity of 6 µ (0.00024 in). The accuracy achieved on the machine was merely seeming!
For this reason the auxiliary shaft have to be handled with care and kept from shocks, concussion and falls.
The accuracy of balancing depends also upon the tolerances of the fit between the mating portion of the auxiliary shaft and the rotor. The corresponding allowance has to be considered in the expected magnitude of the accumulative unbalance limit along with the similar tolerances originating from the eventual assembly of the finished mechanical unit.
Should for instance the maximum permissible variation of the center of gravity amount to 5 µ (0.0002 in) the sum of the following partial tolerances would still be acceptable \
| Tolerances due to the auxiliary shaft Tolerances due to the eventual assembly | Beat Ba = 1µ = (0.00004 in) Fitting allowance Fa = 2µ = (0.00008 in) Beat Be = 3µ= (0.00012 in) Fitting allowance Fe = 4µ= (0.00016 in) |
The total unbalance
U† = = 0.5µ + 1µ + 1.5µ + 2µ = 0.00002 in + 0.00004 + 0.00006 + 0.00008 in < 5µ (0.0002 in)
This Relationship doesn’t take into consideration a residual unbalance of the rotor still present after balancing process; hence the rotor has to be balanced accurately up to “zero”.
Auxiliary shafts with tapered seats have not allowance for the fit, between the shaft and the rotor, which is and advantage over the shafts provided with cylindrical seats.
Should the radial beat of a carefully ground tapered seat amount for instance to 6µ (0.00024 in) a rotor balanced “up to zero” by means of this shaft would still be affected with an eccentricity of the center of gravity with respect to the geometrical axis amounting to 3µ (0.00012 in). Increased by the residual unbalance of 2 µ (0.00008 in) which might have been allowed in order to speed up the balancing procedure, this would result in accumulative limit value of 5µ (0.0002 in). This amount has to be increased by the tolerance due to the eventual assembly. Should the total value lie above the unbalance still permissible for the rotor involved, it would have to be reduced, cutting down the component values which would allow for a convenient improvement.
Furthermore for disk like rotor fastened to a flange of the auxiliary shaft a possible uneven position of the rotor causing a wobbling motion has to be considered. The effect would increase in direct proportion to the ratio of the rotor diameter to the size of the flange. A rotor accurately balanced on such an auxiliary shaft would subject the bearings the bearings to an additional “dynamic” unbalance.
GENERAL RULES FOR BALANCING
In order to achieve a correct functioning of the machine and an exact compensation for the unbalance, following general rules have to be observed:
1) For rotor driven by means of universal joint shaft the weight of the shaft with respect to the weight of the rotor to be balanced has to be kept as small as possible. The magnitude of the motive torque as well as the braking torque should not exceed the nominal value of the admissible torque for the chosen drive shaft. The drive shaft should have no backlash and has to be exactly centered. Discrepancies in the position of the joints are conducive to erroneous measurements. The mating faces of flanges have to be parallel to each other and free from foreign matter. A misaligned drive shaft would introduce errors in the measurements.
2) No foreign objects have to be wedged in the cross-spring hinges of the pickup leverage system, as well as in the guides of the connection rods and between the multiplying levers and the fixed structure of the pedestals. Additional friction in the oscillating bridges and the reciprocating coils would induce angular discrepancies in the indication and cut down the sensitivity.
3) The distance between the correction planes and the length of the radius to the location of the correction have to be chosen as large as possible. This would allow to utilize the full sensitivity of the indication system by reducing the reciprocal influence of the correction planes. Moreover large radii would increase the accuracy in determination of angular positions, and allow a compensation by means of smaller correction weights or drilled holes.
4) Should the compensation for the unbalance be done by drilling, too deep holes have to be avoided. For holes in radial direction the shift of the center of gravity towards the axis of rotation reduces the effect of the compensation. For holes in axial direction a displacement of the center of gravity off the correction planes disturbs the “setting of correction planes”, hence causes the reciprocal influence of the correction planes to reappear at least to some extent. For these reasons it is advisable to compensate for heavy unbalances by means of two holes located to either side of the theoretical position.
5) With rotor composed of distinctly heterogeneous parts, care has to be exercised to avoid displacements which would be likely to influence the readings of the instruments (as for instance the centrifugal setting of coiling of electrical armatures or axial displacements of fan wheels on their shafts).
6) The balancing procedure has not to be continued beyond the condition required (average tolerance values have been established by the Association of German Engineers). A balancing up to “zero” is not advisable as a rule because it increase unnecessarily the production costs.

